To query card data across multiple projects, access the multi-project card report. It is always available by clicking the logo menu in the top right.

Export
Export list of cards
Users can export a list of card data from the Multi-Project Card Report which can be used to generate reports externally in the software of their choice (for example, creating a Pivot Table in Excel).
To get this data,
- Filter the grid as required
- Select all cards to be included in the report
- Above the grid on the left, open "More Actions" and select Re-generate CSV data.
- Once the report is regenerated (the timestamp will be updated), select Download CSV from the "More Actions" drop-down.

Bulk doc download
The Multi-Project Card Report allows users to download documents in bulk from multiple projects at once. This option is available on the top right of the grid under the "More Actions" drop-down.

The naming convention for the bulk doc download can be modified under Admin > General > Project Options > Bulk Doc Pattern. (On the Multi-Project Card Report, this default overrides project settings for bulk doc pattern.)
Filtering
The walkthrough shown below uses the Card List to illustrate filtering options. Filtering on the Multi-Project Card Report screen uses the same layout.
There are different areas of the screen for different types of filters. The sections are called out below:

- Keyword search: a quick text search option
- Filter sets: save your filters as presets for later use (including on other projects/by other users)
- Date and non-column filters: any filter options located outside of the grid
- Column filters: filter by specific columns where they appear in the grid
- Page selection: select grid page and choose how many rows to show per page
- Search modes: Used to toggle between Auto and Manual search. Manual search is useful if you are working with a very large card list and notice slow loading speeds. With Auto search, each filter gets applied as soon as the user clicks anywhere else on the screen. With Manual search, the user must select the Search button to apply filters.
- Column sorting: sort specific columns in ascending/descending order.
Using filters
Different types of information are filtered in different ways, described below. Once applied, filters will be visible above the grid:

If there are more active filters than can fit in a single row, an expand arrow will appear. Selecting it will display the full list of filters:

Date and non-column filters
Click on the Date and non-column filters option to filter by due dates, visibility, sub-supplier, submittal, compilation, or tagged units.

Column filters
Many grid columns have filtering options directly below the column header. Users can type ahead to filter (1) or select one or more options from the dropdown that appears when the box is selected (2).

Save filters (with filter sets)
Created filters can be saved for future use across other projects and for other users, or they can be saved for a specific project only.
To save the current set of filters, click on the plus icon (+) next to the Filter set dropdown.

Add a name, choose display options, and save.
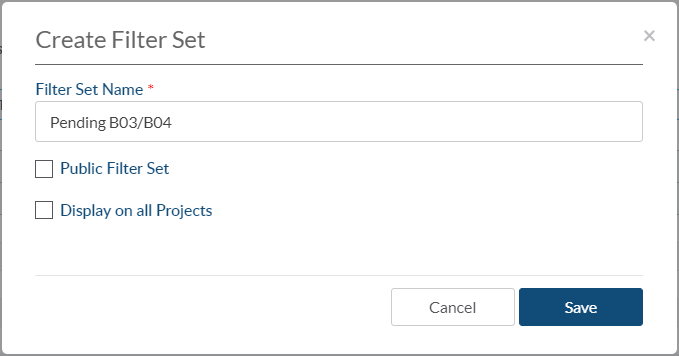
To make this filter set available for other users, click to enable Public filter set.
To make this filter set available on all projects, click to enable Display on all projects.
To use a filter set, select it from the Filter set dropdown:

If a filter set is selected, the icons next to it can be used to save as new, save (update existing), edit name and view options, or delete:

Column sorting
Text and number columns can be sorted in ascending/descending order.
To sort in ascending order (A, B, C / 1, 2, 3), click on the column header once. An upward facing arrow will appear to indicate that the column has been sorted in ascending order.
To sort in descending order (C, B, A / 3, 2, 1), click on the column header a second time. A downward facing arrow will appear to indicate that the column has been sorted in descending order.
