The Library is a space to store documents that can be reused. This can be useful for documents that are unchanging between projects, including (but not limited to) Instruction Manuals, Brochures, MTRs, Welder Cert’s, and Procedures.
To access the Library, select System Menu > Library > Manage Library

Upload to the Library
Individual Documents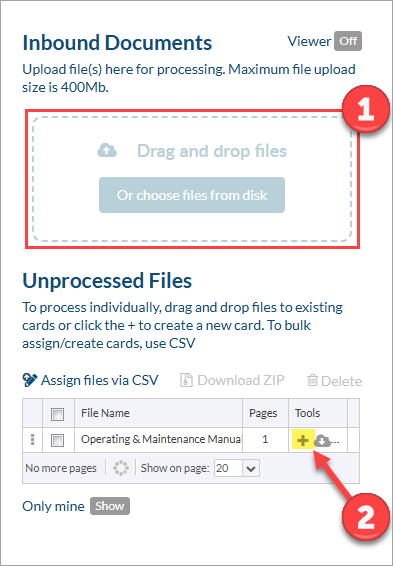

To attach a single document, first upload the document to the "Inbound Documents" section. Once uploaded, the file will be available in the "Unprocessed files" section.
To attach a document to a card, click on the + button of the document (from the "Tools" column) and proceed to enter the appropriate metadata (available metadata discussed below).
Once complete, click save.
Multi Documents
 To add multiple documents to the library, first upload the documents to the "Inbound Documents" section. Once uploaded, the files will be available in the "Unprocessed files" section.
You can then select all applicable documents and select "Assign Files via CSV." From the pop-up, choose "Download CSV Template."
Once exported, you fill out columns with the relevant information. If you are looking to assign the files to existing library cards, simply enter the applicable Library ID for each file.
Note: Columns with an asterisk (*) symbol are mandatory. The first and second column (i.e., "ID (Do not Touch)" and "File Name (Do not Touch)", respectively) should not be modified.
Once complete, save the file and go back to your grid. Select "Import from CSV," and choose your file. After clicking "Save," metadata will be applied to each file
Available Metadata Fields
Reminder: Mandatory fields are marked with an asterisk (*). There may also be fields that are mandatory for the library document type which are not marked as mandatory on the .csv.
Below is a list of fields available when bringing documents into the library:
- Company: This is the company that the library document is associated with (in other words, who owns the Instruction Manual, Brochure, MTR, etc.)
- Reviewing options: The reviewing options are designed to keep documents as current as possible. During the initial upload you assign the reviewing options and associated the documents to a specific customer. When the document has reached the review period or expiration date, an alert will appear in the library reminding you that cards need review. The grid row will also change color to indicate they have expired.
- No Reviewing – the document will never need to be reviewed
- By Review Period -Months between reviews. (12=one year)
- By Expiration Date – A specific date for reviewing the document
- *Document type: This is the grouping you want the document to be assigned to. (This plays an important role when using the auto assign feature.)
- Examples: Manual, MTR, Other, Test Procedures, Weld Procedures, Welder Certificates, etc.
- Keywords: Keywords can be entered to improve searching ability. Note that additional keywords will be added automatically as the document is used in production.
Note: This list is not exhaustive - there will be other fields depending on the field settings for the selected library document type.
Adding/Editing Library Document Types
To add a new Document type (or edit an existing Document type), select System Menu > Library > Library Document Types

Alternatively, new Document types can be added from the assign screen when bringing in a new library document.

Adding/Editing Library Card Fields
From the System Menu, select Admin > Customization > Library Card Fields to access the library card field list. From here, you can add and edit custom fields as needed. These fields will automatically be available in the library and in the pattern search when attaching library docs to codes.

For more information about adding/editing Library Card fields, see this article.