To add and edit headers and footers to your documents, navigate to the Main Setup page of your project where available fields are shown in the Formats group > Document Header/Footer Settings.

- Font - Default is set to size 8 but can be changed to any other size up to 72.
- Margin Top/Margin Bottom – This setting establishes the distance from page margins. Note that "0" is the shortest distance and subsequent numbers gradually move Header/Footer away.
-
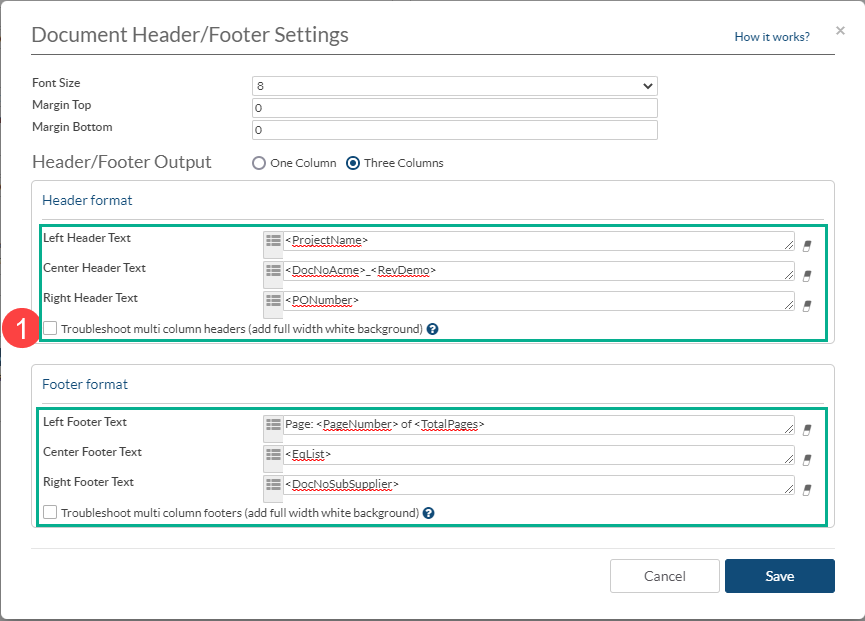
Header/Footer Output:
- One Column: This will show all the data included in the header and footer in only one column with the selected alignment (left, center, right).
-
Three Columns: This options allows you to set the data in the header and footer in 3 different columns for each alignment (left, center, right).
-
Troubleshoot multi column headers/footers (add full width white background) - Only available on Three Columns Output: Column blocks are added in sequence. If there is a lot of text, then the size of one block could overwrite the other column. As a result some of the previous column block may be hidden in the output. If you enable this option, all data is written to one block. Any text which is too long will be displayed on screen - overwriting other text, you can then identify the conflict and edit the variables/text as required to fix, or put all data into a single block to avoid overwriting.
-
Document Header/Footer Format – To edit format, select the desired variables by clicking on each available field, or type text manually. It's also possible to add new variables by creating custom Doc Code/Card fields. For more details about new fields click here.


-
-
-
- Data can also be added in more than one line if required, by pressing Enter on your keyboard, in any of the Text fields.
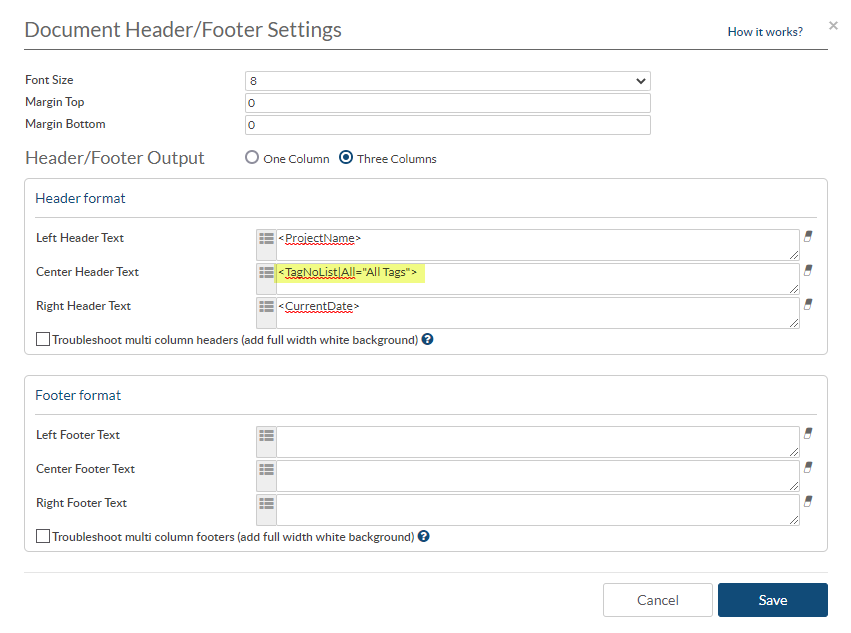
- Parameters are available for use with TagList, Eq_List, SupplierLineNumbers_List variables in header/footers as follows:
- All="text"
- Multiple="text"Example if result is all tags, output will be "All Tags"
- Other available parameters are:
- split("-",X,"Y") where - is delimiter, X is segment (integer), Y is optional parameter, text to replace value in segment in the case if delimiter is not found inside value, or there is no X segment inside value.
- count=X where X is integer (or |count(X) or |count(X,"Y")
- length(X,"Y") where X is integer, Y is optional parameter, ellipsis
- uppercase
- separator="X", where X is text/symbol
- OR operator can also be used to take first non-null value. OR must be in caps and the only two characters between two variables.
- IF statements are available for Header/Footer formatting.
- A variable for formatting header/footers based on if a card is Auto-generated or Manually created is available, even though it is not in the selectable values. Type "<CardType>" and use the values "Manual" or "Auto". For more information on using IF statements see our article here.
-
-

5. Align – If using One Column Header/Footer choose between Left, Center and Right alignment.
6. Save - Click save after all changes are made.
Non-standard characters supported in Header/Footer
All non-standard characters such as other languages, are now supported in headers and footers.

Show header/footer on cover pages – Be sure to mark the checkbox if you wish to use the header and footer format also in the cover pages.

Note: When a document doesn't change (i.e. new version is not updated), the system will NOT re-apply the header footer. This usually happens when re-sending the documents received from the customer for final approval.
To edit the setting on a specific submittal, you can check the "Add Header/Footer" checkbox on the submittal window.

You can edit this setting on each card prior to the submittal window if you prefer.
If you wish to toggle the header/footer for all cards for a doc code, you can do that on the code list.

* Note that if you want to immediately apply the change to all cards for that code (if the file is already uploaded to the card) you must select the code and click Apply to Cards (button at bottom) after you make the setting in the code list.